欢迎来到北京豫维科技有限公司网站!
24小时咨询热线
1891184992324小时咨询热线
18911849923热门关键词:苏玛罐,原子吸收分光光度计,环境监测产品,液相色谱,色谱柱。
更新时间:2019-01-25
GC 柱温箱加速插入套件-用于AgilentGet the same GC separation in less time—use a GC Accelerator kit and the EZGC method translator to accurately convert methods to a scaled-down column format.

Get the same GC separation in less time—use a GC Accelerator kit and the EZGC method translator to accurately convert methods to a scaled-down column format.
Scaled-down methods let you speed up analysis time and increase sample throughput without capital investment.
GC Accelerator kit installs easily without damaging the GC column or interfering with the MS interface.
Designed with GC-MS users in mind, the GC Accelerator kit provides a simple way to speed up sample analysis. By reducing oven volume, these inserts allow faster ramp rates to be attained, which reduces oven cycle time and allows for increased sample throughput and more capacity to process rush samples. When faster ramp rates are used, existing methods can be accurately scaled down to smaller, high-efficiency, narrow-bore columns using Restek’s EZGC method translator. With a scaled-down column, a properly translated method, and a GC Accelerator kit, you can obtain the same chromatographic separation—often with greater sensitivity—in a fraction of the time without making a capital investment.
订货信息:
GC 柱温箱加速插入套件-用于Agilent 6890和7890仪器
| 描述 | 货号 |
| GC 柱温箱加速插入套件 | 23849 |
GC Accelerator Use
Installation
Turn off the oven and wait until the oven, inlets, detectors, and MS transfer line have cooled.
2. Ensure the column and the column hanger are in the back position in the oven
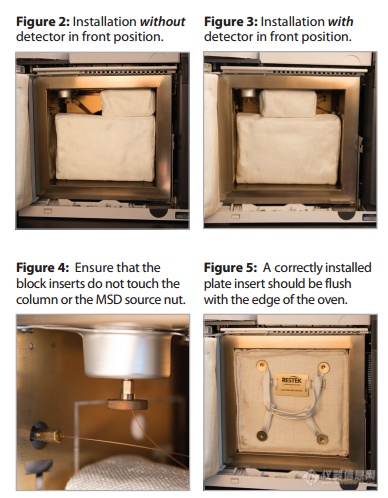
3. If no detector is in the front position, install the two block inserts in front of the column as shown in Figure 2. If there is a detector in the front position, install the two block inserts in front of the column as shown in Figure 3.
Caution: The block inserts should not touch the analytical column or the MSD source nut (Figure 4).
4. Install the plate insert in the front of the oven so that the front is flush with the edge of the oven (Figure 5).
Removal
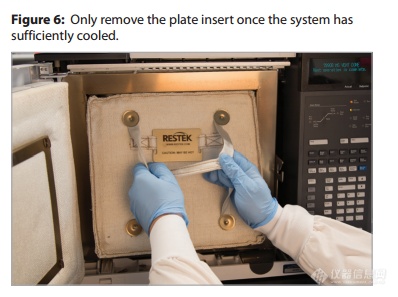
Turn off the oven and wait until all oven, inlets, detectors, and MS transfer line surfaces have cooled.
Caution: To avoid burns, use the strap to remove the plate insert or wear heat-resistant gloves. The metal fasteners and label tag on the plate insert may still be hot even after the GC oven has cooled down.
Grip the strap on the plate insert and remove it by pulling the bottom edge out first (Figure 6).
2. Remove the block inserts carefully; do not allow them to contact the column or the MSD source nut.
 免费咨询:
免费咨询: 发邮件给我们:yuweichina86@163.com
 在线客服
在线客服 电话咨询
电话咨询

